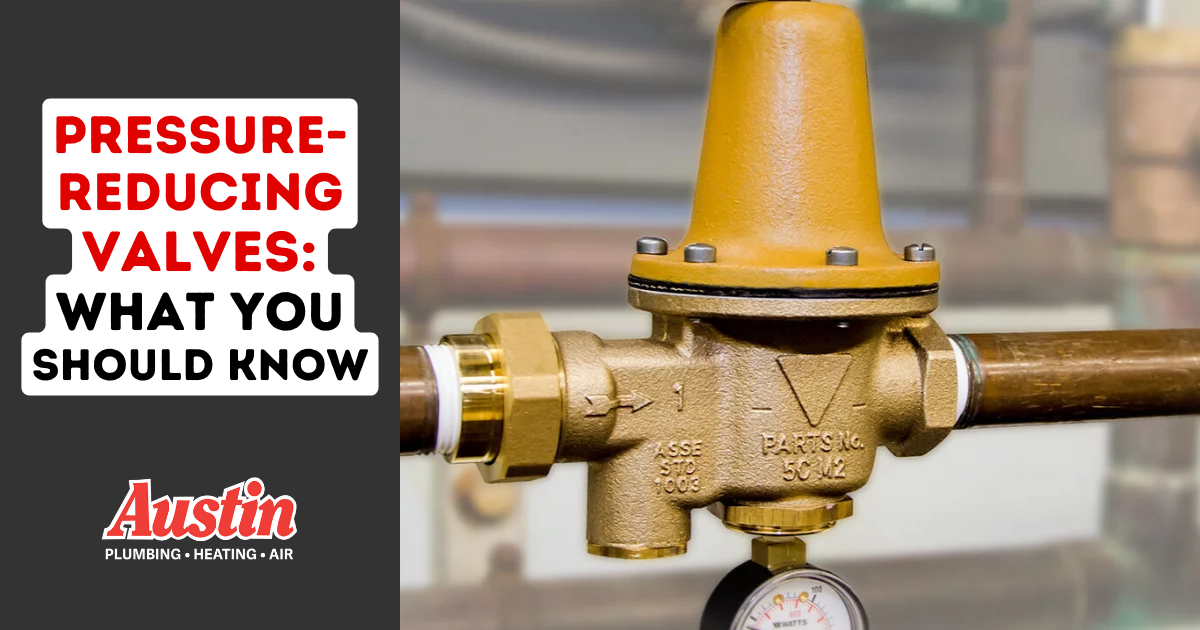
Mon – Fri: 7 AM – 5 PM

Hose Bibb Winterization: Easy Guide to Winterizing Your Hose Faucets

Winterize your hose bibbs before winter comes, because after is too late. Our Master Tradesman is here to show you how.

Don't let your faucets freeze!

Winterizing your hose faucets and pipes is something you can learn to do for yourself in order to save on stress and money over the course of the year. If the concept of winterization is totally new to you, you’re far from alone. In fact, most customers stand to benefit from having a proper introduction to the topic! There’s no good reason to keep customers in the dark about how to winterize their own hose faucets-so let Austin Plumbing, Heating & Air demystify it for you.

What exactly is “winterizing”?

“Winterizing” is an industry term that refers to the process of preparing your hose systems for long periods of dormancy during the cold months. Really, it’s as simple as that.

Now that you know the “what”, let’s get right into why, when, and how you should approach it. (At the end of the article, you’ll find our easy-to-follow, step-by-step winterization guide so you can go ahead and get started.)

Why winterize your hose faucets or hose bibb?

The main reason to winterize is to prevent broken, busted water pipes. A hose faucet (or hose bibb) that isn’t properly prepared for the winter is one susceptible to freezing and cracking, which can cause extensive damage to your home. Furthermore, winterizing actually extends the life of the hose bibb itself. And lastly, winterizing now means no leaking or spraying later when the cold season is finally over.

When should you winterize?

This one may sound self-explanatory (and in some places, it probably is), but the answer really depends on your environment. If you’re located in Wisconsin like we are, you’ve probably already noticed how capricious and unpredictable its weather patterns can be. It’s the reason many residents like to head south for the winter. For clients who spend the winter away, we recommend getting it done before you go-even if it’s “not that cold” yet!

In general, you should at least aim to winterize your faucets before the season of hard, overnight frosts and extended, below-freezing temperatures sets in. It’s normal to plan on winterizing some time in October. To be safe, though, it’s best to winterize as soon as you’re finished with all of your outdoor work for the season. Again, it’s wise to do so even if you finish “early” (before the temperature drops significantly).

FAQ

My hose faucet is frost-free. Do I still need to winterize it?

Good question. Regular, old-school spigots require winterization on a strict yearly basis-but these days, Wisconsin requires hose faucets be “frost-free” to avoid the dangers of winter-wrecked pipes altogether. This means that if you have a newer hose system (installed in the last 20 years or so), yours is probably frost-free.

In a frost-free system, the handle that you turn to run water outside of the home actually opens and closes a valve inside the home. This valve can usually be found 10 to 12 inches inside the building envelope. During normal operation, shutting off a frost-free hose bibb from the outside diverts the water from that part of the piping and causes it to flow directly to the home’s exterior, which means your outside piping doesn’t retain all that water. Thus, it won’t become full of ice or suddenly be forced to expand when the weather freezes.

To put it simply: properly-installed, frost-free hose faucets are made to survive the winter without any know-how or intervention required on your part. However, for maximum protection we still recommend winterizing them as normal. Taking precautions to preserve your hose faucet/piping is never a bad thing-nobody ever regrets being careful with their plumbing system!

I have an insulated faucet protector. Can I skip winterization?

Here in Wisconsin, the answer is unfortunately NO! The fact is that insulated/outdoor faucet protectors just aren’t adequate to replace basic winterization procedures.

That’s not to say insulation provides no protection for your hose faucet. It’s essentially a foam shield that goes around the hose faucet. Theoretically, this shield protects against brief, unexpected lows-but it’s not capable of preventing frozen/burst pipes in the thick of winter. Since you’ll ultimately have to winterize anyway, this “solution” is redundant and not recommended.

If you’re considering getting an insulated faucet protector, our advice is to save your money. There’s a reason plumbing and HVAC companies-at least, honest ones-recommend winterizing.

How to winterize your hose faucet/hose bibb:

This process can be done with only one person, but it requires some walking back and forth between the indoor and outdoor valves. As you read along, you’ll begin to see how soliciting help from a friend can speed things up significantly.

  1. Remove the garden hose from the hose faucet. The number one cause of hose faucet problems across the board-from the frost-free kind to the regular old spigots that Austin Plumbing, Heating & Air deals with-is leaving a garden hose attached to it all winter long. This will stop any faucet, even a frost-free one, from being able to drain adequately. Your future self will thank you for unscrewing it ahead of time.
  2. Go into your basement and turn off the water that feeds the outdoor faucet. To locate the valve in your basement, look where the piping leads toward the hose faucet outside.

    The two basic types of valves commonly used in hose systems are lever-handle (or ball-valve) and circular-handle (or gate-valve). The former must be rotated clockwise until you see that the handle is oriented perpendicular to the pipe*. For the latter, simply rotate it clockwise as far as you can, until it won’t turn anymore.

*In the example above, the lever valve in figure B is shown ON/OPEN and PARALLEL.

3. Head outside again and open up your hose faucet to drain the exterior part of the piping. Don’t be concerned with how much or little comes out. Simply leave the hose faucet in the open position on the exterior of the home.

4. Back in the basement, remove the drip cap from the interior valve. (Refer back to the image in step 2 for the location of the drip cap.) We do this to release the airlock on the system and allow full drainage of the portion of piping that runs between the shut off valve and the exterior of the home. You should expect to see only a small amount of water come from this step; a small cup should be sufficient to catch it.

If you notice a constant drip, that’s the sign that the shut off valve is not holding, in which case you’ll need our help to repair it.

Once the water stops dripping from the cap, you can replace the drip cap.

5. Go out to the exterior of the home a final time. You can now close (shut off) the hose faucet.

If you follow these steps to winterize your hose faucet/hose bibb at the end of summer, it’ll be a breeze to get it running again next spring. Don’t forget to call us if any issues arise. Happy winterizing!

Summer-izing Your Hose Faucet Guide

Guide to De-Winterizing (or “Summer-izing”) Your Hose Faucet or Hose Bibb

The Wisconsin Master Tradesmen guide to turning your hose faucets on after winter.

In Wisconsin, most hose faucets spend the cold, winter months shut-off and dormant. Now, assuming your hose faucet was properly shut off for the winter, de-winterizing it should be a pretty straightforward process-but it’s still not quite as simple as twisting the handle and calling it a day. When warm weather returns and it’s time to turn your hose faucet back on for the first time since last spring, use this guide to avoid causing any damage to your faucet or your home.

The way you shut down (or “winterize”) your hose faucet will determine how you should turn it back on.

There are a couple of problem signs to look out for before getting started. For example, if you approach your hose faucet for the first time this summer and find the garden hose already attached to it, that means it was left that way all winter long. This can cause a number of problems that are best handled by professionals. Refer to our guide on winterizing your hose faucet for a simple explanation of how to make sure your hose bibb survives the winter, or contact us to get things flowing again safely.

Outdoor hose faucet

Turning the water back on to your hose bibb should be a two-person job.

A properly winterized hose faucet has the water turned off inside the basement of your home. This ensures no latent water flow in the piping between the valve and the outside hose bibb, which in turn prevents freezing. However, restarting your basement valve can still come with issues that can’t be seen from outside. With two people working together-one inside and one outside-you can actually get this process done right fairly quickly.

leaking hose faucetFollow these steps to get your hose bibb flowing properly:

  1. After reattaching the drip cap (if applicable), have person A positioned in the home’s basement to turn on the water valve that runs to the hose faucet. (The drip cap or drip valve releases water pressure and drains pipes after winter closure. If your valve does not have one, don’t worry about it for now.)

    Simultaneously have person B operate the hose faucet from outside to confirm no sputtering or spraying of the side of your home while person A observes for in-home leaks.
  2. The next step is to test your hose faucet with a garden hose attached. Person B should attach the garden hose to the spigot and turn it on.

    As water begins running through the hose from the faucet, minor back-pressure is applied across the entire hose faucet. Person A should remain in the basement and observe for any leaks that could be causing damage which Person B would be unable to see.
  3. The final step is to repressurize the hose. Have person B attach a sprayer or other end nozzle to the garden hose and begin running the water once more. This will test the upper limit of pressure your hose will have to endure all year round. Turn the sprayer on and off several times, giving intervals of a few moments in between each time.


If you got through these steps without a problem, you should be good to go for the entirety of the spring and summer seasons! However, it’s always a good idea to circle back some hours later and repeat the entire process one more time, making sure there aren’t any drips inside or outside, before proceeding with your regular summer hose usage.

If you encounter any issues with your spigot or piping during this process, don’t stress. Team Austin’s experienced plumbers are always ready to troubleshoot for you: just give us a call.

This guide was authored by Eric Smith, a 3rd generation State of Wisconsin Master Plumber, Water Well Pump Installer, Plumbing Contractor, Water Well Contractor, HVAC Contractor and Water Treatment Expert and the owner of Austin Plumbing, Heating & Air. 

Plumbing, Heating, and Air Conditioning Warehouse on wheels

Austin Plumbing, Heating and Air truck, warehouse ib wheels Austin Plumbing, Heating, & Air - Warehouse on Wheels. Unloading a new furnace at a customer's home.

Repairs Made In One Service Call

We are committed to providing you with the best service possible, and that includes arriving at your home with everything needed to complete the job in a timely, cost effective manner.

We call our service trucks “Warehouses on Wheels”, because they’re stocked with all of the tools and parts necessary to complete just about any job on our first trip to your home.

In the event we need an “oddball” part to fix your particular challenge, and it needs to be fixed now, our full-time inventory manager will happily pick up the part from a local supplier and deliver it to the technician in your home-all free of charge!

Contact us to book a service and experience the Warehouse on Wheels first hand.

Will it flush? 3 things you should know about a popular bathroom product

Are Flushable Wipes Ok To Flush?

What you need to know before using this popular bathroom product

If you are someone who routinely uses one of today’s top brands of flushable wipes, you’re already well-acquainted with the benefits. For a variety of reasons, it is easy to see why so many individuals purchase this common bathroom staple.

By now, you’ve probably heard that these wipes are not as flushable as they are marketed to be. However, is this true? If you are curious about whether or not you should be flushing wipes, learn more from our pros.

Should you flush “flushable” wipes?

The short answer to this question is a resounding “no.” While manufacturers of these wipes continue to encourage disposal by flushing, any plumbing or sewer professional would strongly disagree with this guidance.

While you may be able to get away with the occasional use of these wipes, frequent and prolonged wipe flushing will almost definitely result in a clog. Why? Unlike toilet paper, bathroom and feminine wipes are not made from materials that disintegrate within 24 hours. Instead, they are made from synthetic fibers that take weeks to break apart.

The risks are even worse if you have tree roots close to your home. Since tree roots can grow through a home’s underground pipes, these wipes can get tangled in the tree roots. This can lead to a serious blockage that needs emergency servicing.

Why are these wipes marketed as being flushable?

If flushable wipes are anything but flushable, why are they marketed that way? Ultimately, this comes down to a technicality. A flushable wipe WILL pass through the toilet so ‘technically’ it will flush. Much in the same way you could flush a golf ball. It might pass through the toilet but it’s definitely going to cause some problems with your plumbing. PSA: Do NOT attempt to flush a golf ball. Doing so could result in an expensive emergency service call.

What is the worst-case scenario if you frequently flush wipes down the drain?

Continuous use of flushable wipes can result in major clogs and costly damage to your home’s septic system. In the event that your pipes become totally blocked, emergency services are needed to restore water flow. Even if flushable wipes have not yet clogged your personal septic system, they can jam up city sewer systems. In various cities across the country, flushable wipes have been blamed for causing unsanitary blockages – resulting in millions of dollars in damages.

In order to protect your home’s pipes, stop flushing all wipes immediately. Only flush toilet paper and natural waste to ensure that your sewer system remains flowing at all times.

If you have been using flushable wipes on the regular, scheduling a routine drain cleaning is a wise choice. Offering affordable, expert services, we can help restore your drains and eliminate clogs. Contact our team at Austin today at 262-367-3808 to book your service.

Causes of Clogged Drains and Sewer Lines

Sewer Clogged?

There is nothing more unnerving than raw sewage on the floor of your home from a clogged sewer line. 

The average property owner likely knows that sewer lines help transport waste water from the home to the underground sewer mains. Other than that, most property owners give very little thought to their sewer drains.  

Oftentimes there are early warning indicators prior to a sewer line becoming stopped up. 

The most common early warning indicators are water backing up from the floor drain or any drain that makes a gurgling noise after water usage.  

When a toilet is flushed into a drain that is moderately plugged, it will gurgle and flush with very little power. Purposely a sewer line is not supposed to plug.  

Regrettably many homeowners experience this awful event and Austin Plumbing Heating & Air is here to help. We respond to hundreds of plugged or stopped up drain lines each year in Washington and Waukesha counties. 

Clogged sewers can be caused by many different reasons: 

  • Grease build-up
  • An object that enters the sewer that is not dissolvable
  • Too much toilet paper  
  • Tree roots growing in the sewer line 
  • Sagging or bellies in aging sewer lines

Clogged Kitchen Sink Drain 

Kitchen sink drains are one of the most used drains in most residences. Not only is your kitchen sink the most used drain in the residence, but it is also the most abused drain in the residence.  

It is almost impossible to keep small food particles from going down the drain and grease from cooking and dishes finds its way down the drain. Improper use of a garbage disposal also increases the chances of your kitchen sink being clogged up. Over a period of time, the shredding blades on your garbage disposal become dull causing the debris to be ground up in pieces that are too large to safely pass through the plumbing. 

We recommend that homeowners throw peelings from veggies in the garbage (or better yet compost pile) rather than grind them in the disposal. The best use for a garbage disposal is only to grind the smaller food particles up that get washed down the disposal side.   

A good habit to develop when using your kitchen sink is to run hot water for 15-30 seconds to wash down any debris that may be flowing down the drain.  

The type of material that the drain is made of also can dictate the amount of drain problems you have in your home. Older homes that have galvanized pipe or cast iron pipe will have more kitchen sink drain problems than homes that have PVC or copper.  

Austin Plumbing Heating & Air has several types of drain cleaning machines to efficiently clean your drain.  

Clogged Bathtub

Have you ever had ankle-deep water while standing in your shower? 

Many homeowners put up with slow draining bathtubs for months and often years. Some property owners procrastinate the “little drain problems” until it becomes a much bigger issue.  

Eventually, when it’s least convenient, the shower drain will become completely plugged causing an urgent situation. Emergency drain stoppages are very annoying for homeowners, not to mention expensive. 

When a drain becomes slow or gurgling, be sure to call and schedule a service call with Austin Plumbing Heating & Air. 

Sewer Cameras

Sewer cameras are a great way to properly diagnose a reoccuring drain problem. Austin Plumbing Heating & Air has a sewer camera in every service truck. It is standard practice on every main sewer we clean to inspect it with our camera.  

We can properly advise our customers why their sewer is clogged, the likelihood of it happening again, and how to prevent it from happening in the future. Most main sewer lines that have frequent problems have one or more of these problems: 

  • Tree root intrusions
  • A sag or belly in the line
  • A break or crack in the pipe
  • Severe grease or sludge build-up

Water Jetting

High-pressure water jetting is also a very effective way to clean sewers that have a history of drain stoppages. With up to 3,000 pounds of pressure per square inch and up to 18 gallons of water per minute, we can peel off grease and sludge that has built up on the sidewall of the pipe. 

Austin Plumbing Heating & Air wants to inform each client of every possible way to prevent sewer backups and get educated on all of the options and procedures to eliminate future problems.

[fl_builder_insert_layout id=917]